How To Create Fragments In Android Studio
1.1: Creating a Fragment with a UI
Contents:
- What you should already KNOW
- What you will LEARN
- What you will DO
- App overview
- Task 1. Include a fragment for an activity's entire lifecycle
- Task 1 solution code
- Coding challenge
- Task 2. Add a fragment to an activity dynamically
- Task 2 solution code
- Summary
- Related concept
- Learn more
A Fragment is a self-contained component with its own user interface (UI) and lifecycle that can be reused in different parts of an app's UI. (A Fragment can also be used without a UI, in order to retain values across configuration changes, but this lesson does not cover that usage.)
A Fragment can be a static part of the UI of an Activity, which means that the Fragment remains on the screen during the entire lifecycle of the Activity. However, the UI of an Activity may be more effective if it adds or removes the Fragment dynamically while the Activity is running.
One example of a dynamic Fragment is the DatePicker object, which is an instance of DialogFragment, a subclass of Fragment. The date picker displays a dialog window floating on top of its Activity window when a user taps a button or an action occurs. The user can click OK or Cancel to close the Fragment. 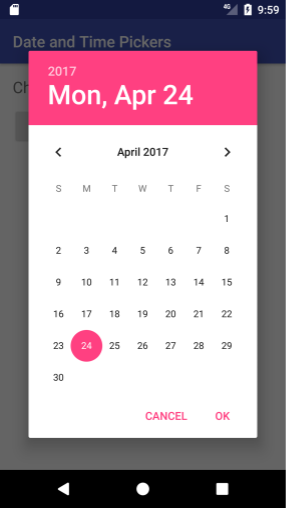
This practical introduces the Fragment class and shows you how to include a Fragment as a static part of a UI, as well as how to use Fragment transactions to add, replace, or remove a Fragment dynamically.
What you should already KNOW
You should be able to:
- Create and run apps in Android Studio.
- Use the layout editor to create a UI with a
ConstraintLayout. - Inflate the UI layout for an
Activity. - Add a set of radio buttons with a listener to a UI.
What you will LEARN
You will learn how to:
- Create a
Fragmentwith an interactive UI. - Add a
Fragmentto the layout of anActivity. - Add, replace, and remove a
Fragmentwhile anActivityis running.
What you will DO
- Create a
Fragmentto use as a UI element that gives users a "yes" or "no" choice. - Add interactive elements to the
Fragmentthat enable the user to choose "yes" or "no". - Include the
Fragmentfor the duration of anActivity. - Use
Fragmenttransactions to add, replace, and remove aFragmentwhile anActivityis running.
App overview
The FragmentExample1 app shows an image and the title and text of a magazine article. It also shows a Fragment that enables users to provide feedback for the article. In this case the feedback is very simple: just "Yes" or "No" to the question "Like the article?" Depending on whether the user gives positive or negative feedback, the app displays an appropriate response.
The Fragment is skeletal, but it demonstrates how to create a Fragment to use in multiple places in your app's UI. 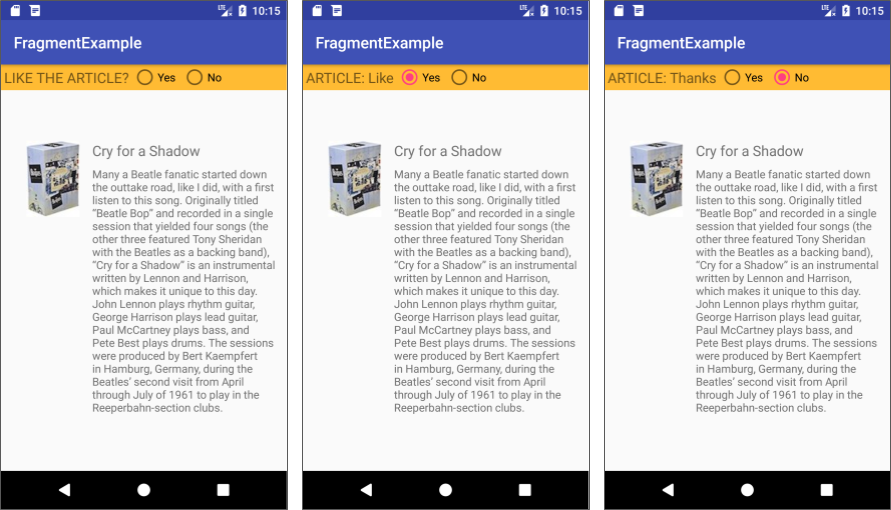
In the first task, you add the Fragment statically to the Activity layout so that it is displayed for the entire duration of the Activity lifecycle. The user can interact with the radio buttons in the Fragment to choose either "Yes" or "No," as shown in the figure above.
- If the user chooses "Yes," the text in the
Fragmentchanges to "Article: Like." - If the user chooses "No," the text in the
Fragmentchanges to "Article: Thanks."
In the second task, in which you create the FragmentExample2 app, you add the Fragment dynamically — your code adds, replaces, and removes the Fragment while the Activity is running. You will change the Activity code and layout to do this.
As shown below, the user can tap the Open button to show the Fragment at the top of the screen. The user can then interact with the UI elements in the Fragment. The user taps Close to close the Fragment. 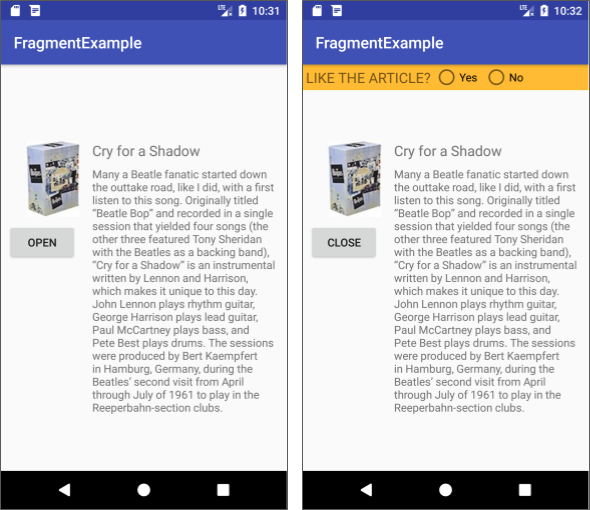
Task 1. Include a Fragment for the entire Activity lifecycle
In this task you modify a starter app to add a Fragment statically as a part of the layout of the Activity, which means that the Fragment is shown during the entire lifecycle of the Activity. This is a useful technique for consolidating a set of UI elements (such as radio buttons and text) and user interaction behavior that you can reuse in layouts for other activities.
1.1 Open the starter app project
Download the FragmentExample_start Android Studio project. Refactor and rename the project to FragmentExample1. (For help with copying projects and refactoring and renaming, see Copy and rename a project.) Explore the app using Android Studio. 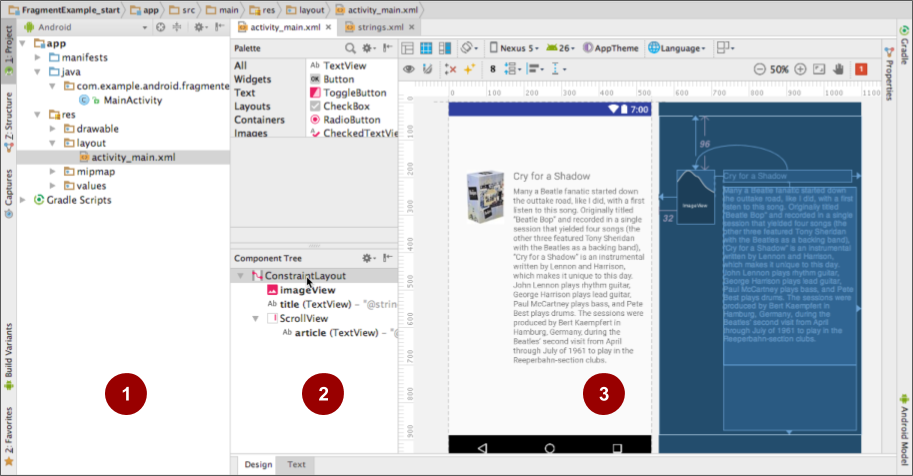
In the above figure:
- The Project: Android pane shows the contents of the project.
- The Component Tree pane for the
activity_main.xmllayout shows theandroid:idvalue of each UI element. - The layout includes image and text elements arranged to provide a space at the top for the app bar and a
Fragment.
1.2 Add a Fragment
- In Project: Android view, expand app > java and select com.example.android.fragmentexample.
- Choose File > New > Fragment > Fragment (Blank).
- In the Configure Component dialog, name the
FragmentSimpleFragment. The Create layout XML option should already be selected, and theFragmentlayout will be filled in asfragment_simple. -
Uncheck the Include fragment factory methods and Include interface callbacks options. Click Finish to create the
Fragment.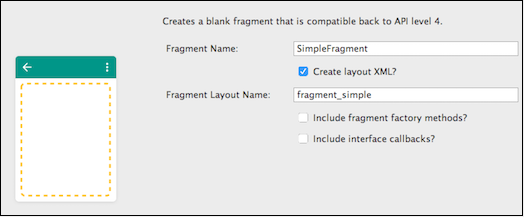
-
Open
SimpleFragment, and inspect the code:public class SimpleFragment extends Fragment { public SimpleFragment() { // Required empty public constructor } @Override public View onCreateView(LayoutInflater inflater, ViewGroup container, Bundle savedInstanceState) { // Inflate the layout for this fragment return inflater.inflate(R.layout.fragment_simple, container, false);All subclasses of
Fragmentmust include a public no-argument constructor as shown. The Android framework often re-instantiates aFragmentobject when needed, in particular during state restore. The framework needs to be able to find this constructor so it can instantiate theFragment.The
Fragmentclass uses callback methods that are similar toActivitycallback methods. For example,onCreateView()provides aLayoutInflaterto inflate theFragmentUI from the layout resourcefragment_simple.
1.3 Edit the Fragment's layout
- Open
fragment_simple.xml. In the layout editor pane, click Text to view the XML. -
Change the attributes for the "Hello blank fragment"
TextView:TextViewattributeValue android:id"@+id/fragment_header"android:layout_width"wrap_content"android:layout_height"wrap_content"android:textAppearance"@style/Base.TextAppearance.AppCompat.Medium"android:padding"4dp"android:text"@string/question_article"The
@string/question_articleresource is defined in thestrings.xmlfile in the starter app as"LIKE THE ARTICLE?". -
Change the
FrameLayoutroot element toLinearLayout, and change the following attributes for theLinearLayout:LinearLayoutattributeValue android:layout_height"wrap_content"android:background"@color/my_fragment_color"android:orientation"horizontal"The
my_fragment_colorvalue for theandroid:backgroundattribute is already defined in the starter app incolors.xml. -
Within the
LinearLayout, add the followingRadioGroupelement after theTextViewelement:<RadioGroup android:id="@+id/radio_group" android:layout_width="wrap_content" android:layout_height="wrap_content" android:orientation="horizontal"> <RadioButton android:id="@+id/radio_button_yes" android:layout_width="wrap_content" android:layout_height="wrap_content" android:layout_marginRight="8dp" android:text="@string/yes" /> <RadioButton android:id="@+id/radio_button_no" android:layout_width="wrap_content" android:layout_height="wrap_content" android:layout_marginRight="8dp" android:text="@string/no" /> </RadioGroup>The
@string/yesand@string/noresources are defined in thestrings.xmlfile in the starter app as"Yes"and"No". In addition, the following string resources are also defined in thestrings.xmlfile:<string name="yes_message">ARTICLE: Like</string> <string name="no_message">ARTICLE: Thanks</string>The layout preview for
fragment_simple.xmlshould look like the following: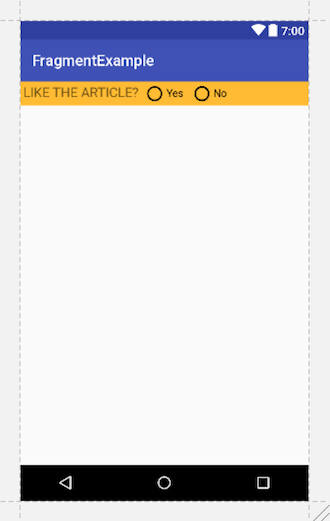
1.4 Add a listener for the radio buttons
Add the RadioGroup.OnCheckedChangeListener interface to define a callback to be invoked when a radio button is checked or unchecked:
- Open
SimpleFragmentagain. -
Change the code in
onCreateView()to the code below. This code sets up theViewand theRadioGroup, and returns theView(rootView). TheViewandRadioGroupare declared asfinal, which means they won't change. This is because you will need to access them from within an anonymous inner class (theOnCheckedChangeListenerfor theRadioGroup):// Inflate the layout for this fragment. final View rootView = inflater.inflate(R.layout.fragment_simple, container, false); final RadioGroup radioGroup = rootView.findViewById(R.id.radio_group); // TODO: Set the radioGroup onCheckedChanged listener. // Return the View for the fragment's UI. return rootView; - Add the following constants to the top of
SimpleFragmentto represent the two states of the radio button choice: 0 = yes and 1 = no:private static final int YES = 0; private static final int NO = 1; - Replace the
TODOcomment inside theonCreateView()method with the following code to set the radio group listener and change thetextView(thefragment_headerin the layout) depending on the radio button choice:
TheradioGroup.setOnCheckedChangeListener(new RadioGroup.OnCheckedChangeListener() { @Override public void onCheckedChanged(RadioGroup group, int checkedId) { View radioButton = radioGroup.findViewById(checkedId); int index = radioGroup.indexOfChild(radioButton); TextView textView = rootView.findViewById(R.id.fragment_header); switch (index) { case YES: // User chose "Yes." textView.setText(R.string.yes_message); break; case NO: // User chose "No." textView.setText(R.string.no_message); break; default: // No choice made. // Do nothing. break; } } });onCheckedChanged()method must be implemented forRadioGroup.OnCheckedChangeListener; in this example, the index for the two radio buttons is 0 ("Yes") or 1 ("No"), which display either theyes_messagetext or theno_messagetext.
1.5 Add the Fragment statically to the Activity
- Open
activity_main.xml. -
Add the following
<fragment>element below theScrollViewwithin theConstraintLayoutroot view. It refers to theSimpleFragmentyou just created:<fragment android:id="@+id/fragment" android:name="com.example.android.fragmentexample.SimpleFragment" android:layout_width="0dp" android:layout_height="wrap_content" app:layout_constraintLeft_toLeftOf="parent" app:layout_constraintRight_toRightOf="parent" app:layout_constraintTop_toTopOf="parent" tools:layout="@layout/fragment_simple" />The figure below shows the layout preview, with
SimpleFragmentstatically included in the activity layout: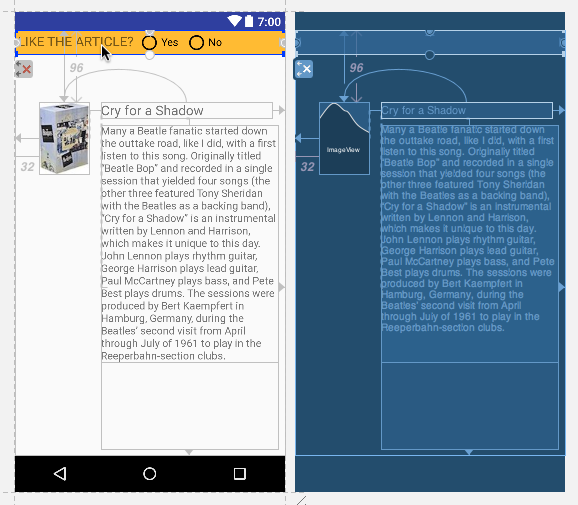
A render error may appear below the preview, because a
<fragment>element can dynamically include different layouts when the app runs, and the layout editor doesn't know what layout to use for a preview. To see theFragmentin the preview, click the @layout/fragment_simple link in the error message, and choose SimpleFragment. -
Run the app. The
Fragmentis now included in theMainActivitylayout, as shown in the figures below. -
Tap a radio button. The "LIKE THE ARTICLE?" text is replaced by either the
yes_messagetext ("ARTICLE: Like") or theno_messagetext ("ARTICLE: Thanks"), depending on which radio button is tapped. -
After tapping a radio button, change the orientation of your device or emulator from portrait to landscape. Note that the "Yes" or "No" choice is still selected.

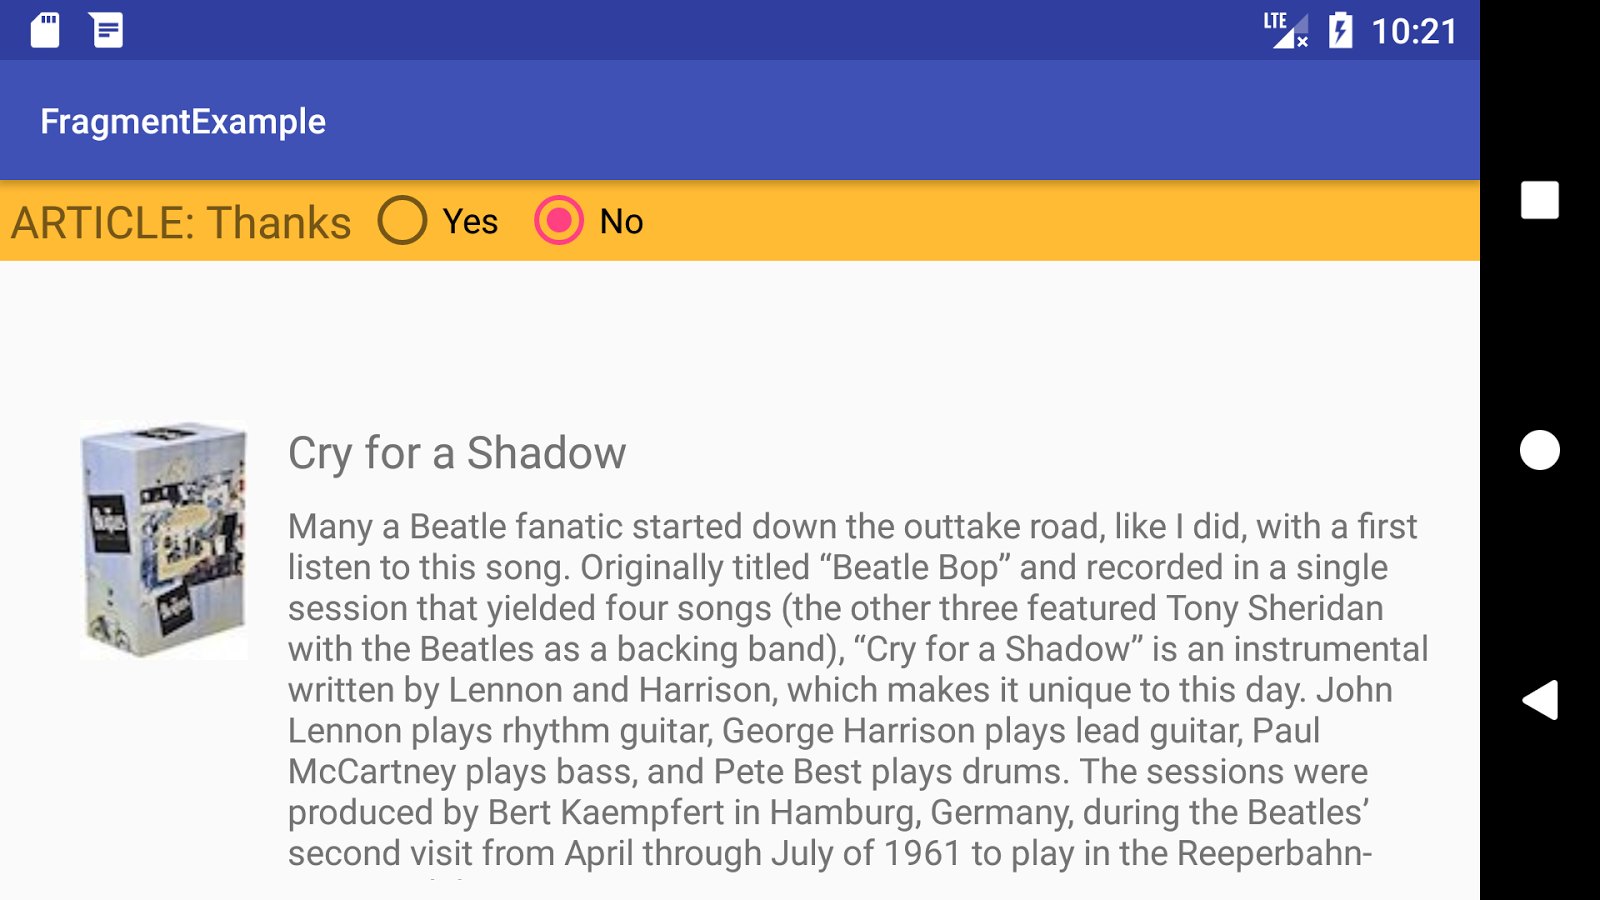
Switching the device orientation after choosing "No" demonstrates that a Fragment can retain an instance of its data after a configuration change (such as changing the orientation). This feature makes a Fragment useful as a UI component, as compared to using separate Views. While an Activity is destroyed and recreated when a device's configuration changes, a Fragment is not destroyed.
Task 1 solution code
Android Studio project: FragmentExample1
Coding challenge
Note: All coding challenges are optional.
Challenge: Expand the Fragment to include another question ("Like the song?") underneath the first question, so that it appears as shown in the figure below. Add a RatingBar so that the user can set a rating for the song, and a Toast message that shows the chosen rating.
Hint: Use the OnRatingBarChangeListener in the Fragment, and be sure to include the android:isIndicator attribute, set to false, for the RatingBar in the Fragment layout.
This challenge demonstrates how a Fragment can handle different kinds of user input. 
Challenge solution code
Android Studio project: FragmentExample1_challenge
Task 2. Add a Fragment to an Activity dynamically
In this task you learn how to add the same Fragment to an Activity dynamically . The Fragment is added only if the user performs an interaction in the Activity—in this case, tapping a button.
You will change the FragmentExample1 app to manage the Fragment using FragmentManager and FragmentTransaction statements that can add, remove, and replace a Fragment.
2.1 Add a ViewGroup for the Fragment
At any time while your Activity is running, your code can add a Fragment to the Activity. All your Activity code needs is a ViewGroup in the layout as a placeholder for the Fragment, such as a FrameLayout . Change the <fragment> element to <FrameLayout> in the main layout. Follow these steps:
-
Copy the FragmentExample1 project, and open the copy in Android Studio. Refactor and rename the project to
FragmentExample2. (For help with copying projects and refactoring and renaming, see Copy and rename a project.)If a warning appears to remove the
FragmentExample1modules, click to remove them. -
Open the
activity_main.xmllayout, and switch the layout editor to Text (XML) view. - Change the
<fragment>element to<FrameLayout>, and change theandroid:idtofragment_container, as shown below:<FrameLayout android:id="@+id/fragment_container"
2.2 Add a button to open and close the Fragment
Users need a way to open and close the Fragment from the Activity. To keep this example simple, add a Button to open the Fragment, and if the Fragment is open, the same Button can close the Fragment.
- Open
activity_main.xml, click the Design tab if it is not already selected, and add aButtonunder theimageViewelement. - Constrain the
Buttonto the bottom ofimageViewand to the left side of the parent. -
Open the Attributes pane, and add the ID
open_buttonand the text "@string/open". The@string/openand@string/closeresources are defined in thestrings.xmlfile in the starter app as"OPEN"and"CLOSE".Note that since you have changed
<fragment>to<FrameLayout>, theFragment(now calledfragment_container) no longer appears in the design preview—but don't worry, it's still there!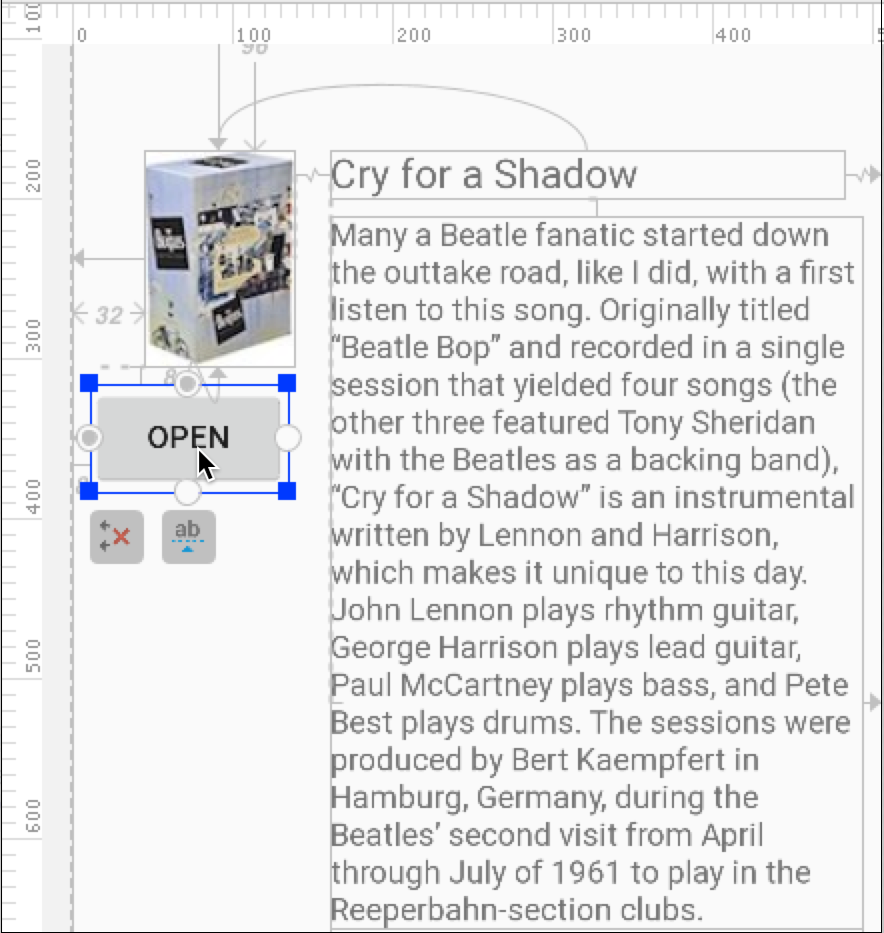
-
Open
MainActivity, and declare and initialize theButton. Also add aprivatebooleanto determine whether theFragmentis displayed:private Button mButton; private boolean isFragmentDisplayed = false; - Add the following to the
onCreate()method to initialize themButton:mButton = findViewById(R.id.open_button);
2.3 Use Fragment transactions
To manage a Fragment in your Activity, use FragmentManager. To perform a Fragment transaction in your Activity—such as adding, removing, or replacing a Fragment—use methods in FragmentTransaction.
The best practice for instantiating the Fragment in the Activity is to provide a newinstance() factory method in the Fragment. Follow these steps to add the newinstance() method to SimpleFragment and instantiate the Fragment in MainActivity. You will also add the displayFragment() and closeFragment() methods, and use Fragment transactions:
- Open
SimpleFragment, and add the following method for instantiating and returning theFragmentto theActivity:public static SimpleFragment newInstance() { return new SimpleFragment(); } - Open
MainActivity, and create the followingdisplayFragment()method to instantiate and openSimpleFragment. It starts by creating an instance ofsimpleFragmentby calling thenewInstance()method inSimpleFragment:public void displayFragment() { SimpleFragment simpleFragment = SimpleFragment.newInstance(); // TODO: Get the FragmentManager and start a transaction. // TODO: Add the SimpleFragment. } -
Replace the
TODO: Get the FragmentManager...comment in the above code with the following:// Get the FragmentManager and start a transaction. FragmentManager fragmentManager = getSupportFragmentManager(); FragmentTransaction fragmentTransaction = fragmentManager .beginTransaction();To start a transaction, get an instance of
FragmentManagerusinggetSupportFragmentManager(), and then get an instance ofFragmentTransactionthat usesbeginTransaction().Fragmentoperations are wrapped into a transaction (similar to a bank transaction) so that all the operations finish before the transaction is committed for the final result.Use
getSupportFragmentManager()(instead ofgetFragmentManager()) to instantiate theFragmentclass so your app remains compatible with devices running system versions as low as Android 1.6. (ThegetSupportFragmentManager()method uses the Support Library.) -
Replace the
TODO: Add the SimpleFragmentcomment in the above code with the following:// Add the SimpleFragment. fragmentTransaction.add(R.id.fragment_container, simpleFragment).addToBackStack(null).commit(); // Update the Button text. mButton.setText(R.string.close); // Set boolean flag to indicate fragment is open. isFragmentDisplayed = true;This code adds a new
Fragmentusing theadd()transaction method. The first argument passed toadd()is the layout resource (fragment_container) for theViewGroupin which theFragmentshould be placed. The second parameter is theFragment(simpleFragment) to add.In addition to the
add()transaction, the code callsaddToBackStack(null)in order to add the transaction to a back stack ofFragmenttransactions. This back stack is managed by theActivity. It allows the user to return to the previousFragmentstate by pressing the Back button.The code then calls
commit()for the transaction to take effect.The code also changes the text of the
Buttonto"CLOSE"and sets the BooleanisFragmentDisplayedtotrueso that you can track the state of theFragment. -
To close the
Fragment, add the followingcloseFragment()method toMainActivity:public void closeFragment() { // Get the FragmentManager. FragmentManager fragmentManager = getSupportFragmentManager(); // Check to see if the fragment is already showing. SimpleFragment simpleFragment = (SimpleFragment) fragmentManager .findFragmentById(R.id.fragment_container); if (simpleFragment != null) { // Create and commit the transaction to remove the fragment. FragmentTransaction fragmentTransaction = fragmentManager.beginTransaction(); fragmentTransaction.remove(simpleFragment).commit(); } // Update the Button text. mButton.setText(R.string.open); // Set boolean flag to indicate fragment is closed. isFragmentDisplayed = false; }As with
displayFragment(), thecloseFragment()code snippet gets an instance ofFragmentManagerusinggetSupportFragmentManager(), usesbeginTransaction()to start a series of transactions, and acquires a reference to theFragmentusing the layout resource (fragment_container). It then uses theremove()transaction to remove theFragment.However, before creating this transaction, the code checks to see if the
Fragmentis displayed (notnull). If theFragmentis not displayed, there's nothing to remove.The code also changes the text of the
Buttonto"OPEN"and sets the BooleanisFragmentDisplayedtofalseso that you can track the state of theFragment.
2.4 Set the Button onClickListener
To take action when the user clicks the Button, implement an OnClickListener for the button in the onCreate() method of MainActivity in order to open and close the fragment based on the boolean value of isFragmentDisplayed. The onClick() method will call the displayFragment() method to open the Fragment if the Fragment is not already open; otherwise it calls closeFragment().
You will also add code to save the value of isFragmentDisplayed and use it if the configuration changes, such as if the user switches from portrait or landscape orientation.
- Open
MainActivity, and add the following to theonCreate()method to set the click listener for the Button:// Set the click listener for the button. mButton.setOnClickListener(new View.OnClickListener() { @Override public void onClick(View view) { if (!isFragmentDisplayed) { displayFragment(); } else { closeFragment(); } } }); - To save the boolean value representing the
Fragmentdisplay state, define a key for theFragmentstate to use in thesavedInstanceStateBundle. Add this member variable toMainActivity:static final String STATE_FRAGMENT = "state_of_fragment"; - Add the following method to
MainActivityto save the state of theFragmentif the configuration changes:public void onSaveInstanceState(Bundle savedInstanceState) { // Save the state of the fragment (true=open, false=closed). savedInstanceState.putBoolean(STATE_FRAGMENT, isFragmentDisplayed); super.onSaveInstanceState(savedInstanceState); } - Go back to the
onCreate()method and add the following code. It checks to see if the instance state of theActivitywas saved for some reason, such as a configuration change (the user switching from vertical to horizontal). If the saved instance was not saved, it would benull. If the saved instance is notnull, the code retrieves theFragmentstate from the saved instance, and sets theButtontext:if (savedInstanceState != null) { isFragmentDisplayed = savedInstanceState.getBoolean(STATE_FRAGMENT); if (isFragmentDisplayed) { // If the fragment is displayed, change button to "close". mButton.setText(R.string.close); } } - Run the app. Tapping Open adds the
Fragmentand shows the Close text in the button. Tapping Close removes theFragmentand shows the Open text in the button. You can switch your device or emulator from vertical to horizontal orientation to see that the buttons andFragmentwork.
Task 2 solution code
Android Studio project: FragmentExample2
Summary
- To create a blank
Fragment, expand app > java in Project: Android view, select the folder containing the Java code for your app, and choose File > New > Fragment > Fragment (Blank). - The
Fragmentclass uses callback methods that are similar toActivitycallbacks, such asonCreateView(), which provides aLayoutInflaterobject to inflate theFragmentUI from the layout resourcefragment_simple. - To add a
Fragmentstatically to anActivityso that it is displayed for the entire lifecycle of theActivity, declare theFragmentinside the layout file for theActivityusing the<fragment>tag. You can specify layout attributes for theFragmentas if it were aView. - To add a
Fragmentdynamically to anActivityso that theActivitycan add, replace, or remove it, specify aViewGroupinside the layout file for theActivitysuch as aFrameLayout. - When adding a
Fragmentdynamically to anActivity, the best practice for creating the fragment is to create the instance with anewinstance()method in theFragmentitself. Call thenewinstance()method from theActivityto create a new instance. - To get an instance of
FragmentManager, usegetSupportFragmentManager()in order to instantiate theFragmentclass using the Support Library so your app remains compatible with devices running system versions as low as Android 1.6. - To start a series of
Fragmenttransactions, callbeginTransaction()onaFragmentTransaction. -
With
FragmentManageryour code can perform the followingFragmenttransactions while the app runs, usingFragmentTransactionmethods:- Add a
Fragmentusingadd(). - Remove a
Fragmentusingremove(). - Replace a
Fragmentwith anotherFragmentusingreplace().
- Add a
The related concept documentation is Fragments.
Learn more
Android developer documentation:
- Fragment
- Fragments
- FragmentManager
- FragmentTransaction
- Creating a Fragment
- Building a Flexible UI
- Building a Dynamic UI with Fragments
- Handling Configuration Changes
- Supporting Tablets and Handsets
Videos:
- What the Fragment? (Google I/O 2016)
- Fragment Tricks (Google I/O '17)
- Por que Precisamos de Fragments?
How To Create Fragments In Android Studio
Source: https://google-developer-training.github.io/android-developer-advanced-course-practicals/unit-1-expand-the-user-experience/lesson-1-fragments/1-1-p-creating-a-fragment-with-a-ui/1-1-p-creating-a-fragment-with-a-ui.html
Posted by: yeltonthationothe.blogspot.com

0 Response to "How To Create Fragments In Android Studio"
Post a Comment